

🏡 Shed Trends 2025: What Texas Homeowners Are Looking For This Year
May 26, 2025
The Ultimate Shed Buying Guide for 2025
May 27, 2025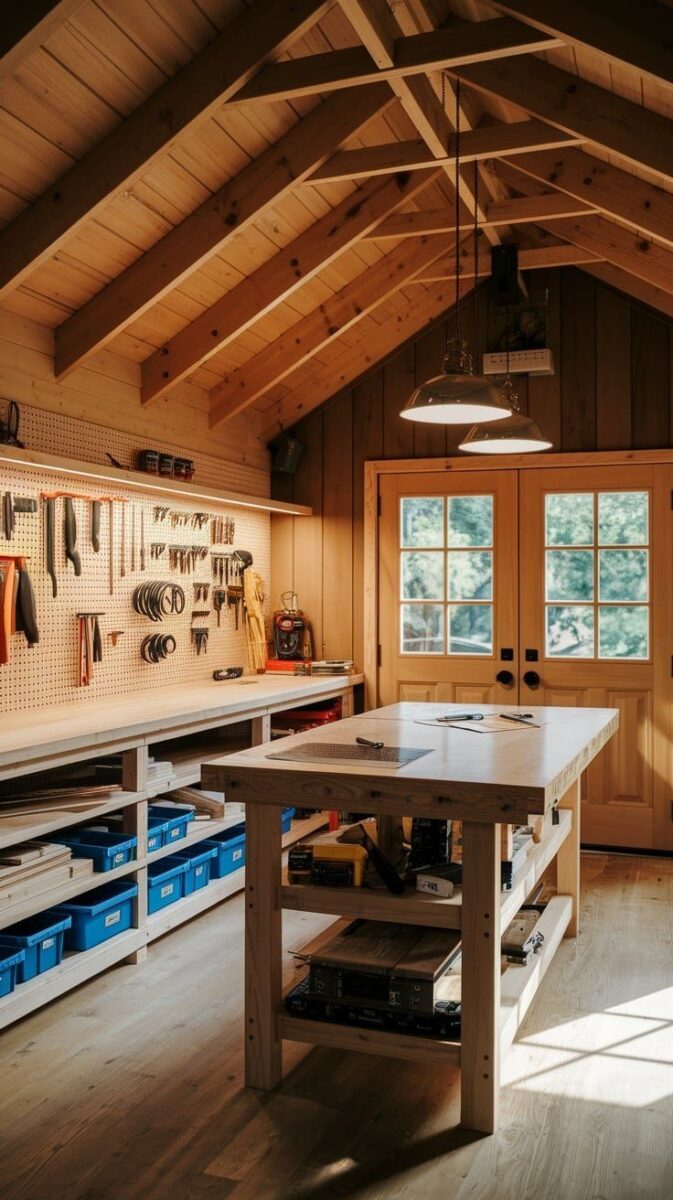
🔨 Transform Your Shed into a Workshop: 10 Tips and Tricks
If your shed is just holding lawn tools and spider webs, you’re missing out on serious potential. With a few upgrades, that humble backyard space can become a fully functional workshop—perfect for woodworking, crafting, repairs, or any project that needs space to spread out.
Here’s how to turn your shed into a hard-working workshop that’s built around your tools, your projects, and your way of working.
1. Clear it out and start with a clean slate 🧹
The first step? Empty it completely. Give yourself space to see what you’re working with. Sweep out dust, get rid of old clutter, and wipe down any surfaces you’re keeping. A blank canvas helps you imagine what’s possible.
2. Plan your layout around your workflow
Think through the projects you actually do. Are you sanding wood? Fixing engines? Creating art? Build the space to match the steps of your process. A good layout saves time and reduces frustration. Keep high-use tools within arm’s reach and heavy equipment near power sources.
3. Add workbenches and sturdy surfaces
You’ll want a solid workbench as your main surface—preferably near a window for natural light. If space allows, consider a second table for assembly or finishing work. Fold-down or wall-mounted benches can help save space in smaller sheds.
4. Install proper lighting 💡
Fluorescent shop lights or LED strips will make a world of difference. You want bright, shadow-free lighting so you can work safely and accurately, even at night or on cloudy days.
5. Insulate and weatherproof the shed
If you plan to work year-round, add insulation and seal any drafts. This doesn’t just keep the space comfortable—it also protects your tools from rust and damage. For colder climates, consider a small space heater or portable fan for the summer.
6. Create smart tool storage 🔧
Wall-mounted pegboards, magnetic strips, and open shelving help keep your tools organized and visible. Use labeled bins for smaller items like screws and nails. The key is everything in its place—so you don’t waste time searching mid-project.
7. Upgrade electrical and outlets
Depending on your tool load, a simple extension cord might not cut it. Hire a licensed electrician to run outlets, add lighting circuits, or install higher voltage if you’re using large power tools. Make safety a priority.
8. Add ventilation and airflow
Workshops can get stuffy fast—especially when you’re using paint, glue, or sawdust-producing tools. Install a window fan or vent to keep air circulating. A ceiling or wall-mounted fan can also help keep temps comfortable.
9. Maximize vertical space
When floor space is tight, the walls (and even the ceiling) become your best friends. Hang tools, ladders, extension cords, or even build overhead racks for lumber and seasonal supplies. Use every inch you can—without making it feel cramped. A well-organized wall can double your working area and keep the floor clear for projects.
10. Make it yours 🎨
Finally, personalize your space. Hang up plans or artwork, play your favorite music, add a coffee corner—whatever gets you in the zone. A workshop should be functional and inviting. When it feels like your space, you’re more likely to use it—and enjoy it.
Your Workshop, Your Rules
Transforming your shed into a workshop is more than a weekend project—it’s an investment in your creativity, craftsmanship, and peace of mind. With a few upgrades and a plan that fits your needs, you’ll have a space that supports the kind of work you want to do.
And if you’re starting from scratch? Wolfvalley Buildings can help you design the right shed for your future workshop—built to last and tailored to fit. 💪


